Do you have chairs in your home that have loose joints or are broken and need to be repaired? We’ll show you how to fix them the right way so they will last the test of time.
In the video How to Fix a Loose Chair is where I teach people how to repair any chair problem. It’s the base level knowledge you need to repair a chair with broken parts. You will learn the anatomy of a chair, how it comes apart, and how it goes back together. Once you’ve learned the basics here, you can move on to Tools & Tips to Fix Wooden Chairs.
First thing I usually do with any chair repair is to check the back of the chair to see if its secure. If it is, then I leave it. If it’s loose, then we need to take the legs off first before you take the back off. On many chairs, the legs and stretchers are in the way, so the back can’t be removed when they’re in place.
Make sure to put some kind of padding on the top and front of your work surface so you’re able to turn the chair upside down on the work bench without damaging the wood on the seat or the back.
 Label the Chair Parts
Before you do anything, be sure to label all the parts with masking tape so you know exactly how the pieces go back together. I use a labelling system where I label the legs:
- FL = Front Left
- FR = Front Right
- BL = Back Left
- BR = Back Right
Then I label the spindles (technically, these are called stretchers) so the masking tape is facing up (which is the bottom when the chair is upright). This is so when you put the chair back together, you will ensure the spindles are the exact same way before you took it apart. This is an important detail as spindles are usually worn down on the top from people putting their feet on them. If you put them back together and some are upside down, you will likely notice a difference. I label these (watch the video at 2:24 to watch chair part labelling) so that the tape on the left and right side are near the front legs and I label them this way:
- TFL – Top Front Left (left spindle on the top, where there are two spindles on the same side)
- BFL – Bottom Front Left (left spindle on the bottom)
- TFR – Top Front Right
- BFR – Bottom Front Right
- For the front and back spindles, I just label them Front and Back.
If you think you might mix up where all these go on the chair bottom, label that too so the legs go in the right spot.
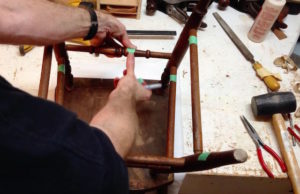
Begin taking the chair apart by using a spreader clamp to lift the legs of the chair out of the seat. Always begin with the front chair legs, especially if the back legs are on an angle (referred to as splayed legs). You can see in detail how to do this in the video.
Once the bottom is taken apart, you can now take the back off if needed. Once this is complete, the process is to clean off the joints, test fit everything, and then add glue and put it back together.
Clean Off Chair Joints
The hole where a round part is inserted is called the mortise and the round part that goes into the hole is called a tenon. It’s important to clean off the mortise and tenon as there is likely old glue, dirt, or finish on the parts. Because new glue won’t stick to old glue or finish, you want to expose new wood so you have a good surface for the glue to adhere to.
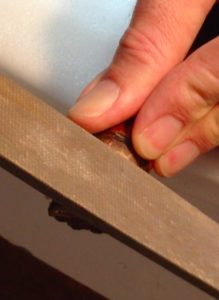
There are two ways to remove old glue and dirt from the tenon. One is to take a strip of sand paper and sand it off. A faster method is to use a file. Just make sure you don’t take off t00 much wood or you will end up with a very loose joint that won’t glue well.
On the mortise, you can do the same thing with the sand paper – just turn it inside out and turn it around in the hole, but again, I prefer a round file, its much faster but be very careful not to ruin the surface and open up the hole. You want to file just enough to take off the old glue and any dirt that would be in there. If the mortise doesn’t go all the way through, it’s more challenging. I use a forcner drill bit to clean those out, and you can see how to do that in the Tools & Tips to Fix Wooden Chairs video.
Test Fit the Chair Joints
Once all the chair joints are cleaned up, you’re ready to put it back together. I recommend putting the chair together without glue first. Think of it as a test run. In woodworking, this is referred to as a test fit. Once you have glue on the parts, you have to move quickly, so take the time now to look for problem spots and organize where your parts go.
Glue up the Chair
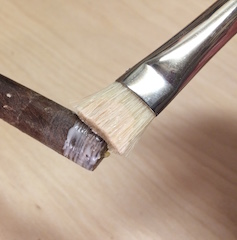 For the glue up, start with spreading glue on the mortise first, and then the tenon. That way you won’t be tempted to set down the part with the tenon that has glue on it. I use an artist brush, which is the best tool I have found for being able to really coat the inside of the mortise. I use carpenter’s PVA glue when doing chair repairs unless it’s an antique… but that’s a different story. I prefer the Lee Valley brand as I can wash out the artist brush and reuse it, even if I forget about it and it dries up. It’s important to make sure when putting the glue on that you are covering all the sides really well. Not putting enough glue in a chair joint, is a common mistake people make that causes the joint to fail again.
Assemble the chair in the reverse order you took it apart. Install the back, if you had to take it off. Then assemble the legs and spindles/stretchers. I place all the legs in the right spot as per your labels to start with, then I glue the joints a few at a time. Put the front together first, then the back and then the sides. The whole leg assembly then goes into the chair seat. A word of caution – don’t be tempted to glue these up in stages and then let them dry as you could end up with an unbalanced chair.
Once the chair is all reassembled with glue, stand it upright, clamp the chair joints (gluing wood requires some pressure), and place a heavy object on the seat to settle the chair on the four legs. Without a heavy object on the seat, you’re likely going to have a wobbly chair where one of the legs doesn’t touch the floor.
I hope this gives you a clear understanding of how to fix loose chair joints. For more furniture repair information, see our furniture page.