 I know two retired woodworkers who have permanent lung damage because of the wood dust they had been breathing in over the years and that is why I pay attention to saw dust in my workshop.
The power tool that most frequently creates dust in my shop is my miter saw, so about 15 years ago I created this miter saw dust collection hood that is really effective. I hope to inspire a few people to do the same in their shop to protect their health!
Dust Collector
Effective dust collection is all about managing air flow, so you want to make sure you use a 1-2 horsepower dust collector. You need to move a large volume of air, so a shop vac isn’t powerful enough to do this. While you can hook up a shop vac to the dust shoot on the saw, there will still be lots of dust that isn’t picked up by the vacuum.
How it Works
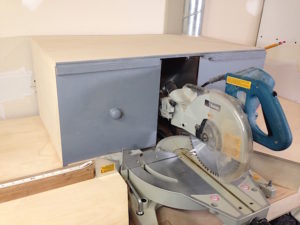
When I built my miter saw dust collection hood, I built it with a very narrow opening as you can see from the photo and because the opening is narrow, my dust collector has a lot of suction and power to pull air from where I don’t want it, to where I do want it. As I am creating dust, the airflow will pick up the dust particles and suck them inside, away from where I am working.
If the opening is too wide you won’t have the power and suction to be able to pull the dust from around the miter saw and into the dust collection hood. Plans for this dust collection hood are available for you to build your own.
Building a Dust Collection Hood
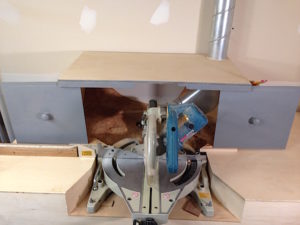 The miter saw dust collection hood I built is a basic box on a flat surface. I built mine on a torsion box, but any flat surface will do. The most important piece is how to make the doors as narrow as possible when you need to make your cuts.
I made a simple track that the doors slide into. I put them just behind the fence and just above the miter saw table. That way I can adjust the doors for any cut I need to make from a bevel cut to a miter cut. When done, I return the miter saw to zero degrees and push the doors in to make the opening as narrow as possible. As I demonstrate in the video, this gives me the best suction I can get with any cut.
 The dust collection hood is hooked up to the dust collector through a spiral duct that goes inside the box where I have a pick up.
Buy the Miter Saw Dust Collection Hood plans
The pick up is made in a Y shape because while the dust hood was pulling about 90% of the dust inside, there was still some dust not being picked up from the front of the miter saw table. The other side of the Y goes down below the table and pulls the dust from the front of the saw table from underneath.
The pick up at the front underneath the table is perfect for when you are making long 12” cuts because it allows you to pull more dust from the front of the saw. When I am making shorter cuts, it’s the dust collection hood that is doing all the work.
So to recap, when building the miter saw dust collection hood:
- Use a 1-2 horsepower dust collector
- Build the dust collection hood to seal all air gaps except the front doors
- Install the doors in sliding grooves
- Install the doors above the miter saw table and behind the fence
- Test cut different size pieces and tweak the dust collection hood design as needed
Please share this article so more people can learn how to protect their health from the hazards of wood dust. Feel free to leave comments or suggestions on YouTube.