Chairs are a common repair for furniture because they are often subjected to a live load due to people shifting and moving in them, leaning back on them and even standing on them.
If you haven’t watched our video on How to Repair Wooden Chair Joints, I recommend that you take a look at it first, because in that video I demonstrate how a whole chair is taken apart and put back together. The information will be helpful when doing any chair repair.
The first thing to know about chair construction is you will rarely see metal in wood, like a screw. Metal is stronger than wood, and when that live load is applied and there is shifting going on, the metal will wear out the wood and therefore cause joints to fail. In some cases an arm of a chair may have a screw in it.
The thing that holds a chair together is glue, and there are different types you can use depending on the type of repair you are doing.
Types of Glue
- PVA Glue (polyvinyl acetate glue) – this is common woodworking glue, sometimes called carpenter’s glue. It’s water based and is easy to clean up.
- Hide Glue – This type of glue is used when you are doing furniture restoration. You can buy this pre-made or more commonly it’s mixed and heated in a pot of warm water, and applied when warm. This glue can be reactivated and loosened up by warming it up. It is good for taking apart antiques without damaging them, therefore it’s the best glue for restoration work. It is the original type of glue used for making chairs over the centuries.
- Polyurethane Glue – this glue would be used if you were building or repairing outdoor furniture. It is a water proof glue that will withstand the outdoor elements. Gorilla Glue is a common brand.
- Epoxy – this type of glue sticks to many types of surfaces and will fill voids in wood. If you have a loose joint that may be missing parts, this glue will hold everything together, where the other types of glue won’t.
PVA glue is used for almost all of the chair repairs I do. This glue is very common, but I make sure I have a good quality brand. I prefer to use the Lee Valley brand as it cleans up well after it dries. You also want to make sure your glue is less than a year old. When I buy my glue I usually will write my own expiry date on it with permanent marker so it reminds me when to throw it out. If you are using glue that is 2-3 years old, there may be a chance that the glue will fail and after going through all the work to repair the chair, you definitely don’t want it to fail because you used old glue!
Applying Glue to Chair Parts
When doing a chair repair you can’t just put a bunch of glue in the hole and hope for the best. In the woodworking world, a hole in furniture is referred to as a mortise, and the part that goes into the hole is called a tenon.
The glue is the only thing that holds everything together and because of that you need to make sure the glue is spread evenly on all sides of the tenon and the mortise. The bottom of the tenon and mortise wont touch, so putting glue there is useless.
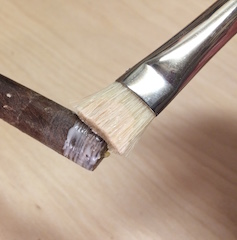
When spreading the glue I recommend using an artist’s brush. I have several that I use in my workshop. They are not expensive, just a few dollars each and they are the best tool for getting in the nooks and crannies and making sure the glue is spread everywhere.
Don’t ever be tempted to use your finger to spread the glue. The oils on your fingers can weaken the glue, so use a brush and only a brush!
Clamping
 For wood to bond together with glue the parts need to be tight and have pressure applied. That is why it is important to clamp pieces under pressure. Don’t go crazy, just a moderate amount of pressure to keep the pieces together.
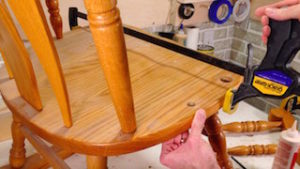
I prefer to use quick grip clamps because they have rubber pads that help adjust and hold the parts of the chairs that are round or on odd angles.
Another way to clamp is by using cotton rope. It must be cotton and no other material to avoid damaging the chair. The rope can be tied around a pair of legs to form a large loop. Then add a dowel in between the two parallel ropes and twist them up to tighten the tension the rope. It’s hard to describe but easy to understand by watching the video, starting at this scene:
I also put something heavy on the chair after gluing to make sure the legs are balanced. This reduces the chance of having the legs uneven which will cause more work to trim the legs after the glue dries.
Cleaning Mortises and Tenons
When gluing up chair parts they have to be absolutely clean as most wood glue will only stick to bare wood. If there is any finish or old glue in the joint the new glue won’t stick. You need to have bare wood on both surfaces.
There are two ways to clean a tenon (the part that goes in the hole):
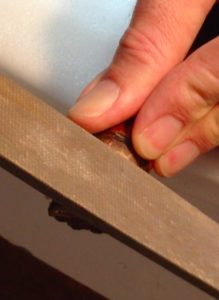
- Take a small strip of sandpaper and sand it off. You can take the sand paper and actually bend it around the wood and twist.
- File the wood, which is actually the faster method. When using the file, just make sure you don’t take off too much of the wood surface or the joint will be loose.
There are 2 types of mortises you will encounter in chair repairs, one is a through mortise where the hole goes all the way through the piece of wood. The other is a regular mortise which is one that has a bottom.
- Through mortise – clean it up using a a piece of sandpaper and twist it around inside, or you can use a round file. Just be careful not to change the shape of the hole or you will end up with a loose joint.
- Regular mortise – I use a drill bit that’s the same width as the mortise and carefully run it backwards while pushing it into the mortise. This reduces the chance of changing the angle of the hole. Once the drill bit is at the bottom of the mortise, I run it forwards to clear out the old glue.
Fixing Loose Chair Parts
If you encounter a repair where the tenon is loose in the mortise, traditional glue won’t stick the joint together because the wood fibres are not connecting. In this case you need to make the tenon thicker, or use epoxy glue, which I try to avoid.
 To make a tenon thicker, I use a thick shaving of wood and glue it around the tenon right before applying the glue and inserting it into the mortise. Once the tenon is seated in the mortise, and while the glue is still wet, trim off the excess wood shaving with a utility knife to get a nice flush fit.
To make the thick wood shaving I use a heavy cut on my hand plane.
Reinforcing Chair Parts
 Sometimes you can just glue a broken part together and it will be strong enough on its own. Other times it needs reinforcement to give it some additional strength.
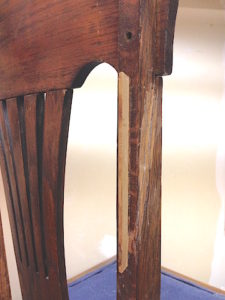
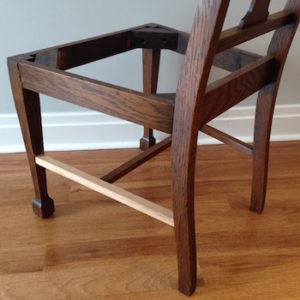
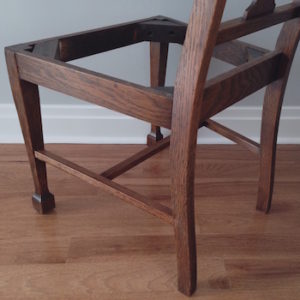
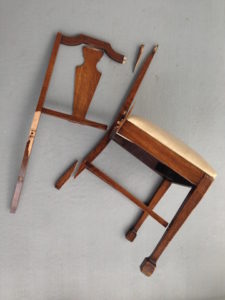
An example of this is using a spline. A spline is a slot cut in the wood where you insert a new piece of wood into the slot, giving it continuous strength through the joint. This photo shows a spline that was added to the back of a chair upright. The break had been poorly repaired before which meant the glue had to be scraped out and therefore there wasn’t a good connection between the mating wood surfaces. This technique is a great way to save a piece of furniture that would otherwise end up in a landfill.
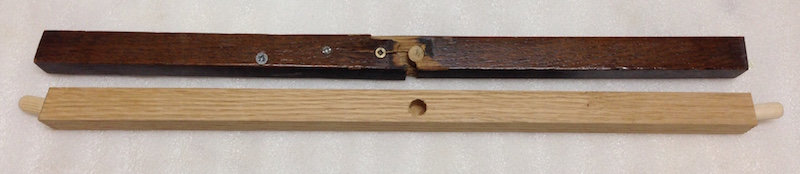
Sometimes reinforcing a broken part will make it strong but in some situations it won’t. Below is an example of a chair stretcher that was broken right at the mortise.
In this case there was no way that piece could have been repaired with just applying glue, so I ended up having to make a new one and replace it.
Pulling Finishing Nails
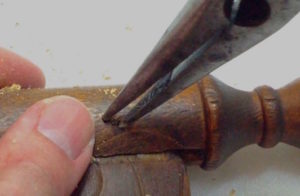 If you are repairing a chair with finishing nails driven through the chair joints, will will need to pull the nails out before you can get the chair apart. There’s no way to easy way to pull them out. I begin by using a small drill bit and drill a hole on either side of the nail. Then I use needle nose pliers to pull the nail out. This is isn’t easy and will challenge your patience.
Unfortunately this method does damage the chair, but if it’s the only way to repair the chair, covering up a few holes is worth it.
I hope you have found these tips to fixing wooden chairs helpful. Let us know what you think.