After you’ve overcome the challenges of building your project, are you fearful that the finish might ruin all your work? That’s the way I felt about a lot of my projects, but with practice and education, I’ve overcome most of those fears. This guide will help you understand the various types of finishes and recommend what to start with as a beginner. Wood finishing is a specific job in the furniture industry, so don’t feel you have to know everything before you begin. We’ll show you how to get started to get some great finishing results, in this post and in the video.
What is a finish for?
The most important thing you need to understand is the purpose of the finish. Bare wood has a flat look to it and it is easily stained by things such as dirty hands, liquids, and everyday wear.
One of the reasons for a finish is to protect the wood from what it will be exposed to. A table, for example, will get more use and abuse than an entertainment unit. Before you choose a finish, consider how durable you want the finish to be.
The other reason to finish wood is to enhance the look of a piece. In some cases, this may mean staining it to give it more color. In other cases, it may be applying a finish that enhances the natural beauty of the wood. A gloss finish for example will make the curves and profiles more noticeable than a flat finish.
What types of finishes are there?
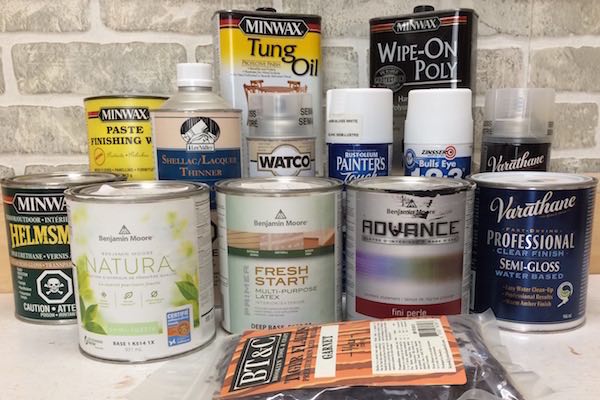
There are many types of finishes, which is why this can be so confusing. Here are the 5 main types of finishes that are commonly used:
- Oil Finish – oil finishes are used mainly on fine furniture and mid century modern furniture. It’s easy to apply but doesn’t offer much protection from liquids. Boiled linseed oil, Danish oil, and Tung oil are the most common oils used for finishing. Mineral oil is used for a food grade finish on cutting boards, charcuterie boards, wooden bowls, and cooking utensils.
- Shellac Finish – a shellac finish is normally found on older furniture and antiques. This is a fast drying finish that protects the wood, but it dissolves with alcohol, so it’s not good for surfaces where alcoholic drinks will be present
- Lacquer Finish – this is also a fast drying finish and it’s not damaged by alcohol. Lacquer is used on a lot of factory-made furniture because it dries quickly to support high production rates. The problem is, this is a very toxic finish and needs to be used with a lot of safety precautions.
- Polyurethane Finish – this is a film finish that’s durable and protects the wood well from wear and tear. It’s sometimes criticized for looking like plastic and taking away from the look of the wood. Polyurethane is available in a water-based and oil-based finish. The oil-based finish has a warm yellow tone to it whereas the water-based polyurethane has a clear look.
- Varnish Finish – this is a unique oil-based finish that is flexible enough to be used on outdoor furniture where the wood expands and contracts. When the wood moves, the finish moves with it and stays intact instead of splitting and breaking down.
Wax is not a finish by itself, but is used in combination with another finish as a top coat.
Types of Stains?
There are a few different ways to stain wood. The two main stains are pigment stains and dye stains. The most common type of stain is the pigment stain. You will find this in any hardware store. A pigment stain has tiny particles that help color the wood. Unfortunately, it also hides some of the natural beauty of the wood.
Some examples of pigment stains include gel stains, which are thick and provide a deep color, oil-baed stains, water-based stains, and even some finishes contain stains in them for a one-step application.
Dye stains soak into the wood without any particles, so it won’t obscure the gain the the wood. These stains are more difficult to source and are typically more expensive than pigment stains.
Recommendation for Beginners
With all those choices, where do you start as a beginner? Here’s what we recommend.
Preparation
Every quality finish starts with preparing the wood properly. It needs to be sanded to a minimum of 220 grit. I typically start sanding with 120 grit sandpaper, then sand again with 220 grit. If you’re working on some rough areas, start with 80 grit first, then work up to 120, then 220. Don’t sand the wood with anything finer than 220 grit sandpaper as it can prevent the wood finish from bonding to the wood. Also, ensure you sand in the same direction of the grain of the wood to prevent visible scratches.
Once you’ve sanded your work, you can check your work it by wiping mineral spirits on the surface. This will show you any scratches or defects.
The last preparation step is to make sure you’re working in a clean space with no dust. Setup your work and wipe everything down with a tack cloth. This is a special cloth with a sticky surface that will pick up all the dust so it doesn’t contaminate your finish.
Safety
A word of caution about finishes – a lot of finishes use chemicals that you shouldn’t inhale. Make sure you use a respirator with an organic filter. When you wear a properly fitting respirator, you won’t be able to smell the finish. Also protect your skin from absorbing the finish by wearing gloves.
Don’t use Stains
Pigment stains can hide the star of the show – the wood. I’ve seen many projects where the stain has ruined the look of a piece because the woodworker didn’t know what they were doing. As a new woodworker I suggest not using stains. If you want your project to have a dark tone to it, use dark wood such as walnut. For a medium tone, use cherry or hickory. Let the wood you choose show it’s character and beauty!
Selecting a Finish
For beginners, I suggest keeping it simple and minimizing the tools you need. Use either an oil finish or a wipe-on polyurethane. You won’t need brushes or need to learn brushing techniques.
An oil finish will protect the wood from minor dust and dirt, but it won’t protect it much from moisture, such as a drinking glass. If you anticipate your piece being used to set glasses or dishes on, you’ll want to use a polyurethane finish.
In fact, if you want to have a really beautiful finish, you can use both. An oil finish penetrates deeply into the wood and will add a 3D effect to the grain as the wood ages (you can watch this in the video above). Apply one coat of oil first, then let if fully dry so it won’t affect the polyurethane. Then apply the polyurethane finish as per the product directions.
A wipe-on polyurethane finish goes on much thinner than a brushed on polyurethane. For surfaces where there will be a lot of use, I suggest 6 coats of wipe-on finish to build up a thicker protective layer.
Applying the Finish
Oil and wipe-on polyurethane go on the same way – with a clean cloth. It’s that simple! Fold up the cloth so it forms a pad without any wrinkles. Pour your finish into a shallow container to allow you to dip the cloth into. Pick up some finish with the cloth and wipe it on in the same direction as the grain. Start at one edge of the piece, furthest away from you. That way if you drip any finish with your cloth, you won’t drop it on your newly applied finish.
Warning: When you’re done, make sure to properly dispose of the application cloth. Oily rags can heat up and start on fire all by themselves. Ensure you read an understand the label for your finish to avoid a fire.
The Final Rub Down
Here’s a tip that took me a long time to learn about. When a finish is cured, there might be the odd fleck that sticks up. If you take a brown paper bag and rub it on the finish, similar to what you would do with sandpaper, it will knock down those flecks without damaging the finish. Try it, and you’ll see the difference a simple paper bag can make.