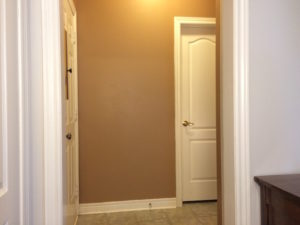
Are you interested in installing wainscoting in your home? We helped a friend install wainscoting panels and trim in a hallway. See how it’s done in this DIY wainscoting project.
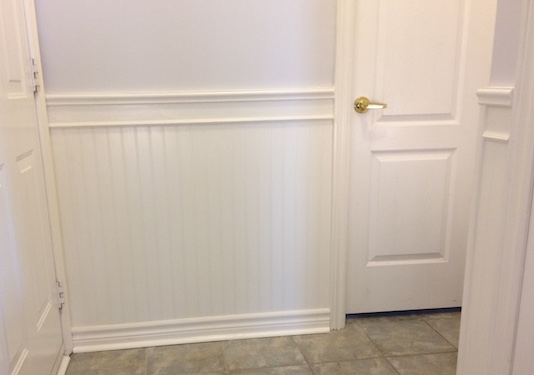
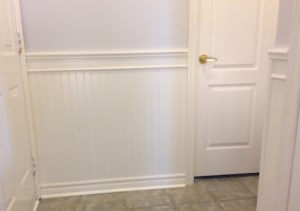
There are different styles of wainscoting, but they all serve a common purpose. They protect the walls from everyday wear and they add style and character to a home. The easiest way to install wainscoting is using panels. Beaded panels are available at any home improvement store and with some added trim, it can really add character and detail to any space.
I prefer to install beaded wainscoting panels with more detail than just a traditional wainscot cap moulding. I add a flat portion and an astragal mould to cover the gap between the flat portion and the beaded wainscoting panel. This is more work, but it significantly elevates the style of the wainscoting.
Start With a Plan
To figure out how much material you need to buy, draw a map of the room, showing where all the doors or openings are that will not need wainscoting. Measure each wall and write the measurements on the map. With this information you can now determine how many pieces of 4 foot panels you need and how much trim you will need. Plan on buying this trim:
- Baseboard (you will have to replace yours)
- Quarter round or shoe mould that matches your home
- Wainscot Cap mould
- Astragal mould
- If you have any outside corners, you will need corner mould
- You will also need some 1/4” thick MDF for the top portion of the wainscoting
- Preparing the Walls
 You will have to remove the baseboard before installing the wainscoting. Once that’s removed, measure out how high you want the wainscoting to be - a typical measurement is about 1/3 the height of the room. Most panels come 32 inches tall, which is 1/3 the height of a standard 8 foot ceiling. The additional flat panel and trim on top will add more height. I typically use the height of the baseboard to ballpark the size of the upper trim portion.
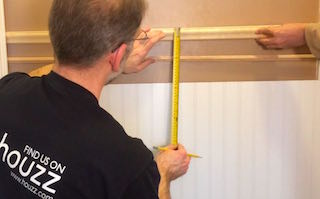
Once you choose your height, use a level and draw the line around the room for the panel installation. Also, use a stud finder to mark the location of the studs as you will want to nail the trim into the studs.
Installing the Wainscoting Panels
For this project, we used a circular saw to cut the panels to size. Using the map for measurements you made when planning, cut all the panel sections. You want to avoid having a cut near a bead in the panel if possible as your eye will see any slight imperfections in the cut if the bead is close versus further away.
Install wainscoting panels with panel adhesive and a few nails to hold the panels in place while the glue dries. Make sure to line it up with the level line you’ve drawn on the walls.
Installing the Trim
 Cut the flat portion of the top to the desired width and install with panel adhesive and glue.
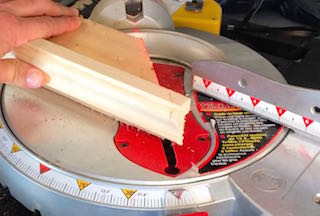
Next, cut the wainscoting cap to fit each wall, using miter joints at the corners. You will need a chop saw or miter saw for this. Add a block of wood on the saw table so you can hold the wainscoting cap upright to cut it. When you get to door trim, cut the wainscoting cap square to start with. Then hold the trim in place and mark where the wainscoting cap lines up with the door trim. Using the chop/miter saw, cut to this line on a 30 degree angle to soften the edge of the trim. Watch the video to see how this looks.
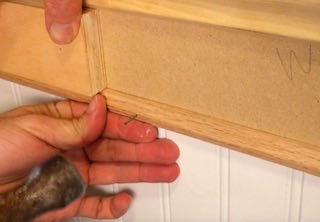
Install the wainscoting cap with glue on the miters and finishing nails into the wall studs. Make sure you use ardox nails (nails with a twist) as they will grip into the stud better than smooth nails.
Install the baseboard next, as you would install baseboard in any other room.
If you have any outside corners, you will have a gap in the wainscoting. Cut and install corner mould with panel glue and nails (drill pilot holes to avoid splitting the trim).
The last moulding to install is the astragal moulding. This covers the gap between the beaded panel and the flat board on top. Cut these pieces to fit, metering them at the corners. Install them with panel glue and nails in pilot holes. Now you have wainscoting!
Caulking & Filling Nail Holes
There are likely places where you have minor gaps. Fill these gaps with standard latex caulking. Make sure to squeeze the calling into the gap and don’t just cover it. This will ensure it stays in place over time. As soon as you squeeze the calking in, wet your finger with water and smooth it out in one long stroke for a nice smooth finish.
Fill all the nail holes with nail hole filler for wood. I apply it so it dries slightly higher than the wood surface so I can sand it down flat with a few strokes of 120 grit sandpaper.
Prime & Paint
Sand down all the edges to ensure they’re smooth before you prime the wood. Don’t be tempted to skip the priming stage - priming bare wood is very important because paint doesn’t stick well to bare wood. Primer is designed to soak into the wood and provide a surface for the paint to stick to. Once you’ve primed all the bare wood, sand it down to remove any rough spots. Vacuum up all the dust and paint away. You will need 2-3 coats of paint for the best finish.
After reading all of this, you might think this sounds like a lot of work. If you know how to safely use a circular saw and a chop saw, this is a project you can handle. The homeowner for this project, Andy, describes his experience at the end of the video and passes along some advice for anyone looking to do a wainscoting project for the first time.
We hope you find this useful information. If you have questions or feedback, please add a comment on the video. We’re happy to respond to your message.