As a Maker, how do you price your work? I have a degree in business and I’ve run my part-time custom woodworking business since 1999. In that time, I’ve learned how to price my work by experiencing what works for me and what doesn’t. Just like learning your craft, you have to gain experience at pricing to get better at it.
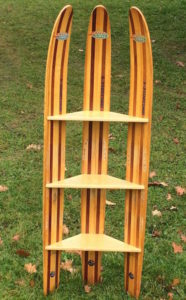
Let me start by walking you through you an example from my business. A customer brought me three vintage water skis and asked me to build a corner shelf for them. I started off by understanding what their needs were so I could design the project. Once I had the design, I could then work out the material costs and the labor costs.
 I estimated the cost of wood was $65. The finish cost for the spar varnish was $25. I estimated this would take me six hours at $30 per hour for a cost of $180. I’ll get into how to figure out your hourly rate later, but what I want to show you is the list of activities I planned for and the estimated amount of time:
- Shopping for material – 1 hour
- Cut shelves – 1 hour
- Profile edges – 1 hour
- Patching skis – 1 hour
- Finishing with spar varnish – 1 hour
- Assembly – 1 hour
When I’m doing my work, I track my work on a clipboard. I write down every task that I’m doing and how long it takes. That way I can compare the activities and time I’ve put into the project and compare that with my estimate. This is a tool that teaches me how to improve my estimating and profitability.
For this project, I underestimated the labor by 3.25 hours, but I made some wise material decisions an only spent $30 on lumber instead of $65. In the end, I under charged what I wanted by $60. I spent a lot more time refinishing the skis than I estimated, so I now know that for the next time I do something like this.
I can’t stress enough, the importance of tracking the costs of time and material to compare them to your pricing. It’s how you will learn to price better. It’s also an early indication if you’re losing money. This isn’t the fun part of what I do as a maker, but it’s a critical part to running any business.
Are there other ways to price work?
There are a few other ways to price your work:
Material times X – If you multiply your material costs by 2 for example, you can quickly get to a price, but this is only recommended if material is consistently a certain percentage of your costs – very uncommon.
Daily rate to price labor – By pricing your labor per day, you can estimate your work in how many days it will take you. I only recommend this if your estimating work that will take weeks of labour. There’s too much margin for error for projects that need hours or a few days of work.
Copy prices of the competition – this is not a good business practice as you could work yourself into business failure. You need to know your costs!
I advocate using time and material to work out your pricing. This takes practice, but it’s the work you need to put in to building a profitable business.
How do I estimate my time?
I’ve taken formal Project Management training, an from that, I’ve learned how to take a project and break it down into small partsEstimate your time by thinking through every task it takes to complete your project from start to finish. Make a list of each task. Don’t forget to consider shopping time, delivery time, or even design time.
Once you have the list of tasks, estimate how much time it will take you to complete each task. As a general rule of thumb, if I have a task that will take me more than 4 hours, I will break it down into smaller parts so I have a more accurate estimate and details to track my time against.
Don’t just think of this as work for building your pricing. Use this to schedule your work and keep you focussed on meeting or beating your estimates when working.
What do I charge for an hourly rate?
Let’s assume you’re building a quote right now for a customer. You’ve done the work to determine your material costs and the time it will take to make the project. But how much do you charge per hour? That’s where most people get confused because the answer is different for every Maker. Let me guide you through deciding on your labor rate. Start with this question – how much do you want to earn?
As a general rule of thumb, multiply your desired hourly labor rate by 2,000 to get a rough ballpark of annual earnings, working 40 hours per week. For example, $20 per hour will earn you about $40,000 before taxes if you can bill 40 hours of time per week. Here’s a list to show some examples:
- $10 per hour = $20,000 per year (before income tax)
- $20 per hour = $40,000 per year
- $30 per hour = $60,000 per year
- $40 per hour = $80,000 per year
Once you decide on what your time is worth, then you need to add on something called overhead. This is to cover the cost of running your business – rent, utilities, supplies, insurance, maintenance of tools, software, marketing, website, phone, mileage, customer service, etc. These costs can be hard to define when you’re just starting out.
For my business, I currently use a 50% overhead charge on labor. For custom built pieces, I currently charge $30 per hour, which is $20 for my labor and $10 for overhead. My overhead costs cover:
- Supplies I stock such as glues, screws, sandpaper, office supplies, etc.
- Business insurance (that’s a whole topic unto itself)
- Phone & Internet
- Computer & Software
- Website costs
- Maintenance (e.g., repairs, blade sharpening, replacing broken parts)
- Workshop improvements
- Customer service communication
- Bookkeeping costs
- Sales activities such as quoting jobs
If you’re working out your overhead costs for the first time, I suggest creating an annual budget to list the items that are part of your business and estimating how much they would cost you per year. The second step is to estimate the number of hours you would work in a year to spread the costs over.
Then you can divide the cost by the number of hours to determine your estimated overhead per hour of labor. The fewer hours you work, the higher your overhead per hour needs to be. This is an estimate so it’s important to track what you actually spend and change this as you go.
Overhead is included in the hourly rates for many makers and trades. Mechanics, Plumbers, and Electricians all use hourly rates. As a point of reference, the shop rate for woodworking in the U.S. and Canada is between $35 and $85 per hour according to FDMC’s Pricing Survey.
I vary my shop rate according to the type of work I’m doing. It ranges from a minimum of $30 per hour to up to $60 per hour. I’ll tell you why you might increase your pricing later in this article.
Now you know all the parts to price your work using an hourly labor rate. But what about material?
What do I charge for material?
For material costs, I charge the retail rate. If I get it at retail cost, or I get bulk or wholesale discounts, I charge the retail rate. Some people mark up the material when pricing, but I don’t think that’s wise. If a customer checks into the cost of material you quote them, and it’s higher than the pricing they have access to, you may come across as gouging them and you lose the customer’s trust.
I build my shopping list for the materials needed and then find the pricing on supplier websites. For frequently used items, I have a cheat sheet handy to save me time. Don’t forget to add taxes and delivery costs.
The last step to effective pricing is to ensure you’re making a good pricing decision.
Validate your pricing
What is the value of your service? Asking yourself, what would a customer pay for this item, is a good sense check. Look at competing products in your local market or markets nearby. A general rule of thumb for pricing is that city prices are much higher than rural prices, so if you sell in the city, you can get more for your products. If you’re selling on the Internet, you’re at the mercy of global competition.
Let’s look at an example of a Potter pricing her hand-made vases at $45 but similar pieces are selling for $60 in a nearby store. This justifies increasing the price.
The opposite is not true – if the Potter’s time and material cost for a piece is $45, and in her area comparable imports from a third-world country are priced at $12, this is a clear warning signal that her products might not sell.
This is where you need to switch from your Maker hat to your business hat and ask yourself “does it make sense to pursue making this product?”
Understanding the value of your product is very important. It’s a combination of knowing your costs, researching the competition, and knowing the market where you are selling.
Some words of pricing wisdom
Expect to lose some work that you price for customers – if you’re not, you’re pricing too low.
I hope this gives you insights to help you understand how to price your work as a Maker. It’s a challenging topic for many people. Just like learning your craft, you will get better at it with practice, so don’t delay. Start using these techniques right now!