In the early stages of our staircase renovation, I installed wainscoting on the staircase to elevate the look of the stairs and hide the old stair components. This meant installing wainscoting on angles. This can be challenging because the angles of the trim are not a standard 45 degree cut on the miter saw. The details here will help you understand how to install wainscoting on angles.
The process of installing wainscoting starts with selecting the material. I used 1/2 inch material for the frames and 1/4 inch material for the panels. The inside of the wainscoting panels is trimmed out with cupboard moulding that I purchased from a local lumber supplier.
Wainscoting Frames and Panels
The first step is to install the wainscoting frames, which outlines the space. At the floor, I usually show about 2 inches of the frame above where the baseboard will be installed. In places were it looked best, I added dividers to create narrow rectangles for the panels. I installed the frames with construction adhesive and nails. I then cut the panels to fit loosely inside the wainscoting frames and installed them the same way.
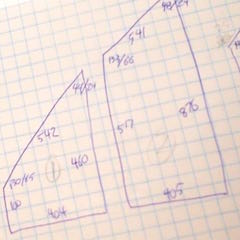 With the panel in place, I sketch out a drawing of the wainscoting panels so I can write down all the measurements. This is a time saver as I can take the drawing into the workshop and cut all the parts in a batch.
Decorative Trim
When I take the measurements of the cupboard mould, I switch to metric measurements. All the building I do is in inches, but when I do trim, I find it easier to work in millimeters instead of trying to figure out how many 16th or 32nd of an inch I need. I use a Stanley measuring tape that has both inches and millimeters on it. After I have the measurements of all the lengths I need, I then measure the angles I need to cut on the miters. I measure using a quality miter gauge and then write down the angles on the drawing.
I use a Mite-R-gage tool to measure angles. It allows me to get quick and accurate measurements of the angles I need to cut in the workshop.
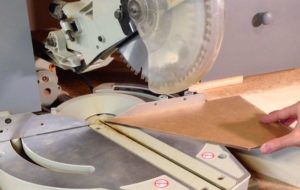 The most challenging angles to cut are the ones that are more than 45 degrees as most miter saws can only cut 45 degrees. To overcome this, I cut a 45 degree panel to use as an auxiliary fence. I then do the math to subtract 45 degrees from the angle I need and set the miter saw (e.g., to cut 66 degrees, subtract 45, which is 21 – set the saw to 21 degrees). This may be easier to understand by watching the video. This can be a dangerous cut if not clamping down the parts, especially if the cupboard mould is wide material, so ensure you’re trained and comfortable with this type of saw operation to avoid an injury.
Once the parts are mitered to length, I test fit them and trim them where needed. I install the cupboard mould with a brad nailer and glue the miters to keep them tight. I then fill the nail holes, sand them, and prime the wood to prep it for paint. I then finish off the work by adding the baseboard and quarter round trim.
Painting the Wainscoting
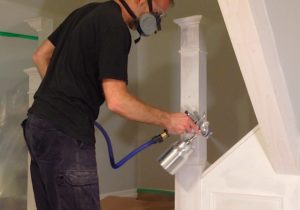 It may sound obvious, but painting the wainscoting can be done with a brush and roller. I primed everything by hand, but it can take a long time to put on a coat. I finished my wainscoting and newel posts by spraying them with an HVLP paint sprayer.
Beaded Wainscoting
If you’re interested in installing beaded style wainscoting, see our DIY Wainscoting Panel Intallation.